
|
PLEASE NOTE THAT LEFT AND RIGHT REFERENCES ARE AS YOU ARE FACING YOUR MOUNTING LOCATION.
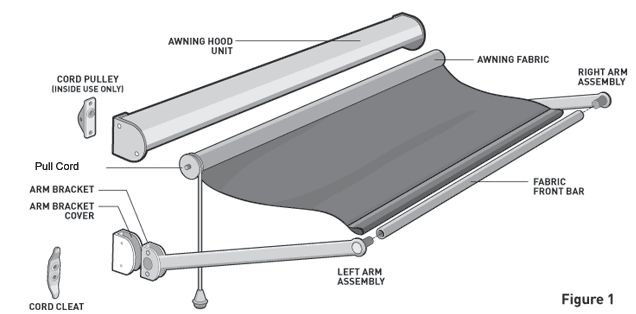
The SunSetter Window Awning can be operated from either inside or outside your home. You will need 4½” of unobstructed vertical space along the wall for the entire length of your awning.
NOTE: For Inside operation, a hole will need to be drilled through the wall on the left side of the Hood Unit. When determining the mounting location of your Window Awning it is important to ensure that there will be no obstruction on the inside of the wall for the Pull Cord drill hole.
 |
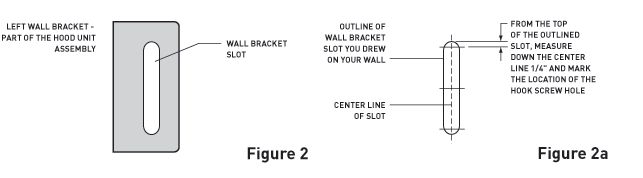
STEP 1. Determine the desired location of your window awning and have a helper hold the Hood Unit in position while you ensure it is level. Once level, use a pencil to mark the outline of the slot in the Left and Right Wall Bracket, as shown in Figure 2 and 2a. Remove the Hood Unit from the wall.
STEP 2. Starting at the top of either of the outlined slots you made in step 1, with a plumb straight edge, draw a line down the center of each slot from top to bottom as shown in Figure 2a. Repeat for the other side of the awning.
STEP 3. Starting on the Left side. From the top of the outlined slot, measure down the center line ¼” and mark the location of the left side Hook Screw hole. Repeat for the right side. (See Figure 2a).
 |
 |
NOTE: If installing Window Awning on wood frame walls w/wood, vinyl, stucco or aluminum siding, proceed with steps 6a and 7a. If installing Window Awning into masonry, brick or concrete walls, proceed to steps 6b and 7b.
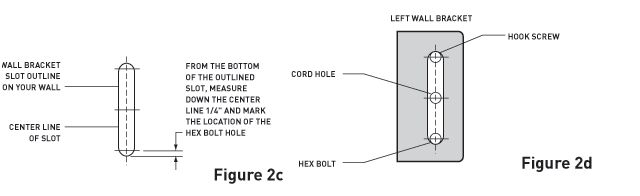
STEP 7a. Install the Hood Unit onto the Hook Screws and ensure it is level. Once level, double check the locations of the Hex Bolt marks, making new marks if needed. Once final Hex Bolt locations are determined, remove the Hood Unit and use a 13/64” drill bit to pre-drill holes in both left and right locations for the Hex Bolts as shown in Figure 2c. Do not install Hex Bolts at this time.
For installation on Masonry, brick or concrete walls, follow these steps:
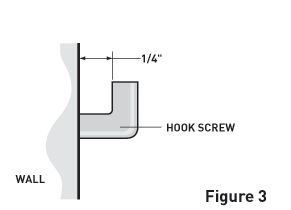
STEP 6b. Using a 3/16”masonry drill bit. Pre-drill pilot holes 1 ¾” deep into the walls at both the left and right locations for the Hook Screws as shown in Figure 2a. With a 5/16” masonry drill bit, enlarge the holes 1” deep. Insert plastic masonry anchors into the holes, large side out. Install the Hook Screws into the Hook Screw locations. Be sure to leave ¼” of the hook screw exposed between the wall and the hooked end of the Hook Screw, see Figure 3.
STEP 7b. Install the Hood Unit onto the Hook Screws and ensure it is level. Once level, double check the locations of the Hex Bolt marks, making new marks if needed. Once final Hex Bolt locations are determined, remove the Hood Unit and using a 3/16”masonry drill bit, pre-drill pilot holes 1 ¾” deep into the walls at both the left and right locations for the Hex Bolts as shown in Figure 2c. With a 5/16” masonry drill bit, enlarge the holes 1” deep. Insert plastic masonry anchors into the holes, large side out. Do not install Hex Bolts at this time.
STEP 8. If awning is to be operated from INSIDE the home, refer to Inside Operation Instructions Below.
If OUTSIDE operation, continue to Step 9.
STEP 9. Install the Hood Unit onto Hook Screws and ensure it is level.
NOTE: It is Important that you check the clearance between the wall bracket and the end of the hook screws, you want the wall bracket to fit snuggly against the end of each hook screw. If you can slide the wall bracket back and forth on the hook screw, remove the Hood Unit and tighten the hook screw one full turn. Install the Hood Unit and check the clearance again. Repeat this procedure until wall brackets fit snuggly against the hook screws.
STEP 10. With Hood Unit level, install the Hex Bolts and washers into the Hex Bolt locations on both the left and right side of the awning using a 3/8” socket with 3” or greater extension.
STEP 11. Insert the Front Bar into the open end of the fabric and center so that an equal amount of the bar is exposed on either end. Allow the fabric to completely unroll.
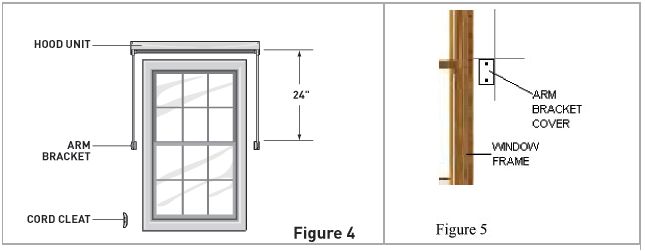
STEP 12. To determine the location for the Arm Bracket measure down 24” from the bottom edge of each Hood Unit Wall Bracket and mark the horizontal as shown in Figure 4.
STEP 13. Using a straight edge aligned with the edge of the Hood Unit, ensure the straight edge is level and mark the vertical where it crosses the horizontal as shown in figure 4. Repeat for both sides of awning.
|
|
 |
STEP 16. Slide the Rubber Front Bar Insert into the front bar. While holding the Front Bar, tighten the Insert using a 5mm Allen wrench. Repeat for the other side of awning.
STEP 17. Determine location of the Cord Cleat on the wall and mark the hole locations. For wood, vinyl, stucco or aluminum siding pre-drill the hole locations using a 1/8” drill bit. For brick or concrete walls, using a ¼” masonry drill bit, drill holes approximately 1½”deep. Insert plastic wall anchors into holes, and using a hammer, tap flush with the surface of the concrete. Install the Cord Cleat using the (#8 x 1) flat head screws provided. For best results, install the Cord Cleat near the bottom left corner of your window as in Figure 4.
WARNING: WHEN OPERATING, STAND TO THE SIDE OF THE WINDOW AWNING AS ARMS ARE SPRING LOADED AND COULD FALL FORWARD RAPIDLY IF NOT OPERATED PROPERLY.
STEP 18. Pull the Window Awning Cord so that the awning fabric rolls up completely under the Hood Unit and tie off cord on cleat.
STEP 19. Install the bottom pan-head screws into the Arm Brackets.
STEP 20. Test Awning for proper operation.
For Inside Operation:
In order for your Window Awning to be operated from inside your home a hole will need to be drilled through the wall before the Hood Unit is installed.
IMPORTANT: Before drilling, record the distance of the cord hole mark made in Step 5 from the window frame and transfer this measurement to wall inside house. Ensure inside location is free of obstruction and will allow needed surface space for the installation of the Cord Pulley.
A. From outside, drill the hole using a ¼ x 6”drill bit (or longer as needed for your outside wall thickness).
B. Insert the Feed Thru Bushing in the hole on outside wall.
C. Cut the end of the cord to remove the Cord Grip and feed the cord through the hole using a coat hanger or knitting needle or a similar object.
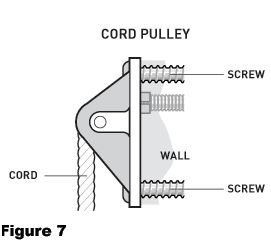 |
D. From inside, the cord should be fed through the back of the Cord Pulley and allowed to hang over the Pulley mechanism, see Figure 7. Fit the Pulley onto the wall making sure the cord opening fits in the drilled hole and mark the upper and lower hole locations.
E. Remove the Pulley and pre-drill the upper and lower hole locations. Install the Cord Pulley onto the wall using two #8 x 1” flat head screws.
F. Your Helper should now install Hood Unit onto Hook Screws on outside wall and ensure it is level.
G. Pull cord through and ensure there is no obstruction. Reattach Cord Grip on end of cord.
H. Determine location of the Cord Cleat on inside wall and mark the hole locations. Pre-drill the hole locations using a 1/8” drill bit. Install the Cord Cleat using two #8 x 1” flat-head screws provided. For best results, install the Cord Cleat near the bottom right corner of your window.
CONTINUE FROM STEP 10 ABOVE.
